Talks from BSDCan2015
Like last year , here are from BSDCan that have stood out to me. I don't think all of the videos have been posted yet so there are probably some gems left to watch. All of the videos are here
Like last year , here are from BSDCan that have stood out to me. I don't think all of the videos have been posted yet so there are probably some gems left to watch. All of the videos are here
I have a navspark gps microcontroller board I backed on indiegogo last year. The board has been sat in my desk for a year so I decided to just use it as a dumb gps and not bother with the microcontroller part of the board.
The default firmware sends nmea strings over a usb serial controller at 115200 baud, this was easy to test with cu. I wanted to use gpsd with the gps, I am planning to integrate it into a wardriving box in the next few weeks.
cu -l /dev/ttyU0 -s 115200
gpsd is unable to accept baud rate changes, instead there is workaround in the faq. The faq is probably wildly out of date, I couldn't get stty to change the baud rate on FreeBSD. I found that FreeBSD offers .init files for each of the serial devices and they should be used for configuring the serial device.
Using the following command worked for me and allowed gpsd to speak to the navspark.
# stty -f /dev/ttyU0.init speed 115200
# gpsd
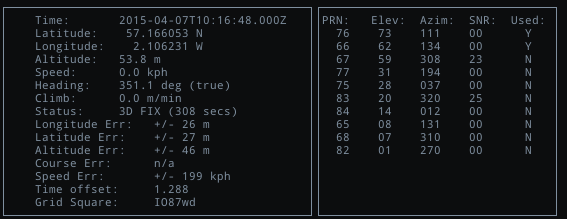
I could then connect to the gpsd and make sure it is working with cgps.
$ cgps -s -u m
I am not really happy with the navspark, the indiegogo made the board look really cool, but so far there no community has formed around the board. This has led to a lack of approachable documentation and an ide only available with Linux and Windows bulds.
I would love to find a cheap gps that emits data over serial. The closest thing is the Adafruit Ultimate gps , but it is far too expensive for what it is. I have a pair of U-Blox PCI GPS cards , so far I haven't been able to get them working with anything.
Using a TP-Link WR703N and a RTLSDR I decided to make a small dedicate SDR box. Using rtl_tcp I can set up the box and a suitable antenna and use it to receive IQ values over a wifi or ethernet link. Using the wifi means I can do this without pluggin a ton of crap into my laptop.
The WR703N has been really well documented, with a full section of mods on its wiki page. I have add serial console headers and a rp-sma antenna connector on the box I used for this project.
These were fun to do, the serial connector makes debricking the WR703N a lot easer, the rp-sma connector allows different antennas to be used with the router. With some more gain behind it, I should be able to place the sdr box somewhere high and out of the way and still be able to connect to it.
For getting OpenWRT onto the WR703N you can follow the generic flashing instructions. Make sure to install Barrier Breaker or later, BB has a prebuilt package for rtl_sdr.
I installed the rtl_sdr software via the web interface, but it can be done from the command line with something like the following.
# opkg update
# opkg install rtl_sdr
Once you have the rtl sdr packages installed, connect your rtl sdr dongle to the usb port then run the following.
$ rtl_tcp -a 192.168.1.1 -n 8 -b 8
This command will start rtl_tcp and have it listen on the 192.168.1.1 address for external connections, without this it will only listen on localhost. If you have configured your network differently you will want to change the listen address.
I had a lot of trouble running rtl tcp for more than a few seconds with a client connected, this was fixed by configuring the buffer options. The -n option configures the number of linked lists rtl tcp will use, -b configures the number of buffers it will use. I have had a quick look at the rtl_tcp source, but I couldn't really figure out why this helped so much.
The last thing to do to test this is connect a client. The rtl sdr tools can't connect to a rtl tcp source, but we can connect and grab some data using netcat.
$ nc 192.168.1.1 > capture.iq
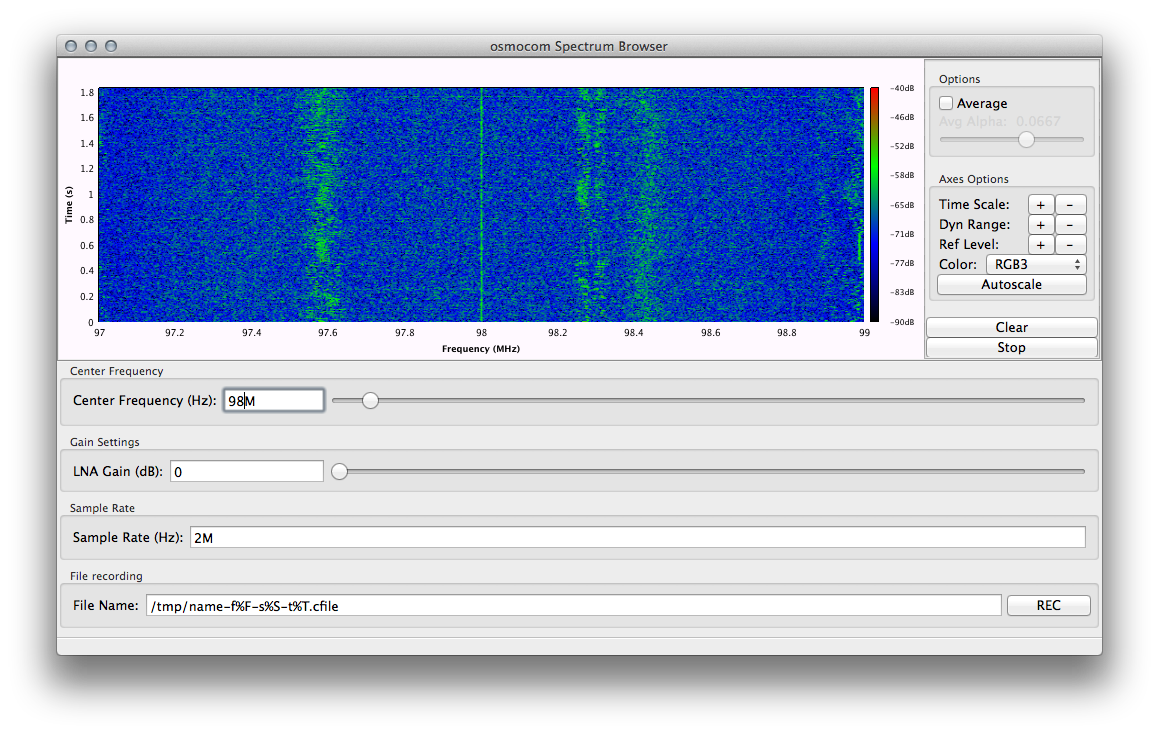
This might be enough if you have a process for dealing with iq data, but I like to look at things. The GrOsmoSDR package comes with a couple of tools for viewing ffts and waterfalls using GNURadio.
$ osmocom_fft -W -s 2000000 -f 144000000 -a 'rtl_tcp=192.168.4.1:1234'

        Without any of the following it will show an fft
-W      Show a waterfall
-S      Show a scope
-F      Show the cool fosphor display
It took me a while to find a screenshot tool as useful as the built in screenshotting tool in OS X. I looked again today and found the import tool that comes as part of ImageMagick.
$ import screenshot.png
You can use it to capture an area on the screen with the above command or you can capture a whole window.
$ import -window root screenshot.png
I will probably throw this into a script and bind it to a key for ease of use.
I needed to add a .ttf font for a presentation I was working on, it turned out to be a lot more hassle than it needed to be.
$ mkdir ~/.font
$ cp font.ttf ~/.font/
$ mkfontdir ~/.font
$ fc-cache
I read a lot about editing xorg.conf to change font paths, in the end it was a matter of refreshing the font cache and restarting evince.